Signing In and Using p_copy
Using Your CSC Computer Account
In many CSC courses, your instructor will distribute computer accounts. These accounts allow you to sign in to classes.csc.lsu.edu a Linux server. The server can be accessed with an sFTP client (such as WinSCP) or by an SSH client (such as Putty). This page previously mentioned FileZilla as an sFTP option. That program is no longer strictly free as it comes packaged with Adware. I no longer recommend it.
Using sFTP, you can copy files from Windows to the server and send them in for grading with the p_copy command via Putty. Your instructor will explain the specifics of doing this for each course.
In more advanced programming courses, you will sign in to classes.csc.lsu.edu using an SSH client such as PuTTY. This presents you with a Linux shell where you type text commands to navigate the file system, perform basic operations such as creating, moving and copying files, and launch programs such as text editors to write programs, compilers to compile them, and the programs themselves. Working on Classes directly teaches you the fundamentals of using a Linux shell which is a valuable skill for professional programmers and for systems or IT analysts or managers.
Shell basics are explained here, but first we will explain how to use an SSH client to connect to the server.
Note: Connecting from Off Campus
If you are working from off-campus (or by cell phone network), you'll need to perform an extra step--connecting to the LSU VPN--before you can connect to the Classes Server. If you're on LSU WiFI (eduroam) you don't need the VPN. The VPN is documented by LSU's Information Technology Services (ITS). Follow the instructions at this link and be sure to test the system early if you plan to work from home. The VPN connection can only be used and tested off-campus. Call the LSU Help Desk for assistance (578-DESK) if you are unable to connect. Once the VPN app is connected, you can proceed to the steps below.
Starting or Downloading Putty (Windows)
If you're using a CSC or CoE lab computer, check the desktop for a Putty icon. Alternately, type putty into the Windows start menu search. Putty should be installed in CSC labs and most College of Engineering labs in PFT.
If Putty is not available, you can download a copy. Admin privileges are not needed to use it. Here's a direct link. Save it to your desktop.
If you're using your own Windows laptop, go to putty.org and click the download link. This takes you to a secondary page (www.chiark...). Get the 64-bit x86 MSI installer. You can also find links to the stand-alone version just below in the "Alternative binary files" section.
Once you've located, downloaded or installed Putty, start the program.
Using Putty
After you start Putty, you'll see a window similar to the one below.
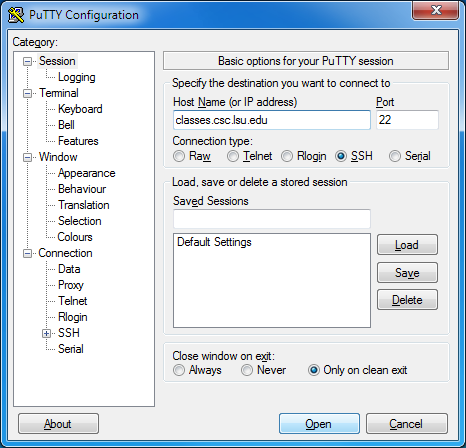
Type classes.csc.lsu.edu in the Host Name field as shown. The port should already be set to 22 and the radio button set to SSH. Press enter or click the "Open" button.
Putty will open a text terminal window with a black background. If it's your first connection from a new device, it will give an authentication warning. Ignore the warning and proceed.
The server now prompts for your Login and password. Use the account information from your instructor. ATTENTION: the system immediately initiates a password reset and you must enter the original password a second time here. If you make a mistake, the window closes without a warning and you must login again from scratch. If successful, you must enter your new password twice. When successful, the window will also close without any message. From then on, login with the new password..
A comman mistake when logging in is to type the username incorrectly. Usernames start with just cs not csc. If you enter the wrong password too many times in a short period, the system will ignore you for 5 to 10 minutes. Putty won't even show a login prompt in this case.
Once you complete the password process and login again, you'll see the Classes server prompt in your Putty window as below.
username@classes:~$
Skip to the section on p_copy to review basic usage and verify your settings.
Note for Mac or Linux Users
Macs and Linux systems should already have an SSH client installed by default. Use your finder or search and look for "term". You may see different variations of Terminal, Term, X-Term and so on. Open any terminal program.
Once you have a terminal open, type the following command where username is the Login listed on your computer account slip obtained from your instructor (for example cs430401).
ssh username@classes.csc.lsu.edu
If it's your first time connecting, you'll get a warning about authenticity asking if you're sure you want to connect. Type yes and press enter. The system will ask for your password. If successful, the system will initiated the password process explained above. As above, whether you successfully set a password or fail to do so, the server will end the session and you'll have to login again to actually begin using the server. Once successfully logged in, you'll see the prompt below with "classes".
username@classes:~$
You should always check that "@classes:" is in your prompt. If not, then your connection attempt failed and you are using a local terminal and still working on your own Mac rather than the server. The Mac and Linux terminals have many of the same commands available as our classes server, so it may not be immediately obvious which one you're using. Check the prompt!
Once connected, you can use my other instruction pages (such as Shell Basics) just the same as students using Putty. Review the final section on p_copy now.
Using p_copy and verify
Your instructor should give you information about using p_copy and verify to submit assignments for grading. Using p_copy relies on settings in a file named .profile. If you accidentally delete this file, you'll get a helpful error message if you attempt to use p_copy (please read it carefully and follow instructions).
In summary, put your assignment in directories such as prog1 or prog2 as directed by your instructor, then call p_copy N to submit all the contents of that directory for grading. Use verify to view what you've submitted and at what time. For example:
$ p_copy 1 #submits contents of prog1/ for grading
$ verify 1 #lists details of files previously sent by 'p_copy 1'
$ p_copy 2 #submits contents of prog2/ for grading
$ verify 2 #lists details of files previously sent by 'p_copy 2'
You should always run verify after p_copy to make sure your work was submitted. If you failed to call p_copy correctly, then a call to verify will reveal that no assignment was submitted.
If you run p_copy a second time for the same program number, it will output a warning that work had already been submitted and exit without sending anything. It gives instructions on how to override this warning and send your updated assignment anyway. Note that if you do this after your instructor's deadline, it would make your work late.